How to install XCP-NG and Xen Orchestra (XOA)
This is a step by step guide on how to install XCP-NG.
XCP-NG is a virtualization software based from the Xen Hypervisor that I’m going to be running on a Type 1 Hypervisor (for my use case scenario on bare metal) that has a built-in virtual machine called Xen Orchestra (XOA) that can be powered on or off for managing the software, hardware, virtual machines and much more within the Web UI. (Web User Interface) XOA can be installed from the Web UI or when you SSH (Secure Shell) into your XCP-NG server.
This can also be ran on a Type 2 Hypervisor such as Virtual box (Free) or VMware Workstation Pro (Free for 30 days) from a Windows or Linux distribution of your choice in accordance to your laptop or desktop operating system.
Linux Users - Ensure you consult your manual to install the applicable graphics and network drivers for full compatibility for Virtualbox or VMWare.
Virtualbox from Oracle - https://www.virtualbox.org/
VMware Workstation Player (Free) - https://www.vmware.com/products/workstation-player.html
VMware Workstation Pro (Free 30 days) - https://www.vmware.com/products/workstation-pro.html
Below are step by step instructions on how to install XCP-NG on a Dell Poweredge T310
XCP-NG download - https://xcp-ng.org/
Balena etcher for creating a bootable media - https://www.balena.io/etcher
Supplemental packs - https://xcp-ng.org/docs/additionalpackages.html
Requirements for a Type 1 (Bare metal) installation:
8 GB USB
Keyboard, Mouse, Monitor with VGA/HDMI
Internet connection preferred, but not required
Desktop or laptop with a 200 GB Hard Drive Disk (HDD) or Solid State Drive (SSD) or add more if need be
RAM recommended - 16 GB or more, but can also run with 8 GB (XOA and XCP-NG run with 4 GB on start up)
Requirements for a Type 2 (Within another operating system) installation:
64 bit Windows 10 or Linux Operating system of your choice
Virtualbox or VMWare workstation
Settings for Virtualbox or VMWare workstation
200 GB or more Disk space
Bridged Network interface
Download the current ISO image of XCP-NG from the website.
WARNING - THIS WILL REMOVE ALL DATA WITHIN THE USB DRIVE
Open Balena Etcher as an Administrator or Super User on linux.
Select your XCP-NG Image and USB Drive.
Select Flash!
After the bootable media is created, safely remove by selecting the USB at the bottom right corner and select “Safely Remove or eject”, insert the USB into the machine you wish to install XCP-NG (Dell PowerEdge T310 in my circumstance).
Power on your device, and select the key combination for the BIOS boot manager (This device is running in BIOS and not UEFI).
Common boot manager key combinations:
Lenovo - F12
HP - F9
Dell - F11/F12
When it’s finished loading the boot menu, navigate to the Hard Drive option and Select the Front USB: USB option within the drop down.
XCP-NG will now begin to boot into the installation on its own, or you may select the Enter key to continue upon seeing the prompt.
Allow XCP-NG to finish the initial process until prompted for the Keyboard layout.
Select the Keyboard layout in accordance to your keymapping (US in my case).
You will be greeted with a screen for initial setup if existing data is on the drive, select ok, or backup your data prior to installation, then reinstall.
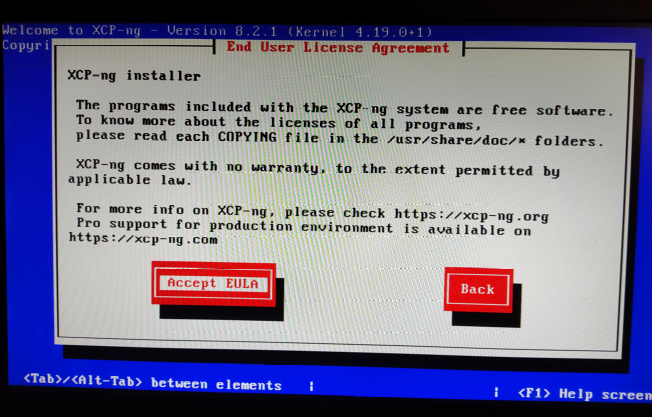
Read and accept the End User License Agreement (EULA) of XCP-NG.
Select to Perform clean installation.
Select the Disk drive you wish to use, in my case it’s the one below
sda – 465 GB [ATA CT500MX500SSD1]
Select the location where the installation media is located, in my case, it’s Local media.
You may verify your installation media if it’s integrity is possibly bad, otherwise Select Skip verification.
Create a strong and secure password for your root account
Select your network interface to be used on the management server
I am using eth0 then select Ok
Configure a Static IP address, Subnet mask and Default Gateway according to your network configuration
Create a hostname and add your DNS Servers
Hostname – xcp-ng-t310
DNS Server 1 – 9.9.9.9
DNS Server 2 – 8.8.8.8
Select your geographical area
Mine is America
Select your timezone
Timezone – Chicago
Select whether to manually enter your time or use an NTP (Network Time Protocol) server
Year – 2022
Month – 12
Day – 29
Hour – 22
Minutes - 11
Select Install XCP-ng
Select Yes or No depending on whether you have supplemental packs
Supplemental packs - https://xcp-ng.org/docs/additionalpackages.html
Select Ok to finish the initial install remove the local media from the device and allow the system to reboot into XCP-NG server
How to install Xen Orchestra with the web UI
Xen Orchestra is a virtual machine you can power on or off at any time and it helps manage your server or multiple servers to add in pools without having to remote into multiple and it’s under one IP address
Navigate to your IP address of the XCP-NG server initially made in the install
Select Advanced > Proceed to the IP address of XCP-NG (unsafe)
Select Quick Deploy
Type your root password you created during the initial install of XCP-NG and select Connect
Create a Username and password for an Admin account for Xen Orchestra (XOA)
Register XOA for all of the features and get a free premium trial for 30 days
Create an XOA machine password if needed or leave blank to have it disabled
How to install Xen Orchestra with SSH
ssh into XCP-NG with the following command and type your credentials.
ssh root@ipaddress
bash -c “$(curl -s https://xoa.io/deploy)”
Configure the IP address or leave blank for DHCP, Netmask, Default Gateway and DNS server
Congratulations! You have now successfully learned and installed XCP-NG and Xen Orchestra either on a Type 1 or Type 2 hypervisor through the CLI (Command Line Interface) and Web GUI (Graphical User Interface)
Navigate to https://ipaddressofXOA in a web browser and enter your username and password you created for Xen Orchestra (XOA) previously.


